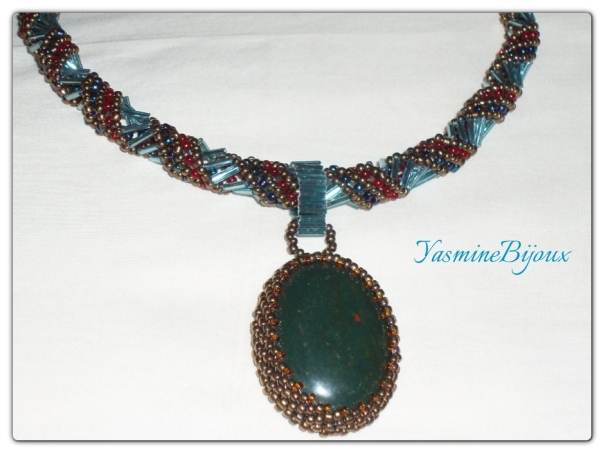
Updates!
Hi everyone! I apologize for the huge lack of posts and updates but a series of events happened, including losing my username and password to login to wordpress (whoops hahah), losing my camera and moving from one country to another!
But I’d like to thank those of you who have stuck around and those who commented and, of course, my new followers! I expect to be able to post new tutorials soon, I just need some time to settle in.
As per usual, if you have a request for a tutorial, be it for a specific piece or just a stitch, please leave a comment of email me ( including a picture if possible) and I’ll have it up as soon as I can!
Thanks again for your endless support and patience , stick around for posts!
Lots of love,
Yasmine
Award Nomination
Hello all! I come bearing good news today. Last night I had the biggest surprise of my life when I checked my notifications here on WordPress. The lovely Chiara from the blog Il Giardino di Perle commented on a post of mine letting me know that she had nominated me for the Very Inpiring Blogger Award, saying she’d thought of me as in her opinion my pieces are one of a kind. I can’t describe how immensely happy and surprised I was at the news. I read and re-read it then went around my house shouting it to one and all! 😃 Thank you so much Chiara, you have made my week! This is the first nomination I have ever received! 🎉🎉
The rules for the award are:
* Link back to the blogger who nominated you
* Post the award image on your post
* Thank the person who nominated you by commenting on their post
* List 7 things about yourself
*Name 15 other bloggers I’d like to nominate for this award
Seeing as I’ve already done the first three, I’ll just list the seven things about myself:
1) I absolutely love music, in particularly 5 Seconds of Summer, One Direction, Ed Sheeran, Justin Timberlake and many, many others and I’m a major fangirl! Haha
2) I love arts and crafts like bead-weaving and crocheting
3) I love to read and write, in fact, I’m currently working on a fan fiction on wattpad ( just in case my username is @BookWormFairyLand)
4) I’m 22 years old
5) I love shoes, especially boots, I’m a sucker for those
6) I love baking sweets. And unfortunately I also love eating them
7) and last but not least I find that I’m currently addicted to social media!!
Below are the 15 blogs I’d like t nominate for this award. There are so many great ones, I hope you check them out, lots of inspiration to be taken!!
https://ilgiardinodiperle.wordpress.com/
http://tacklethatbeadstash.blogspot.com/
http://noonjewellery.blogspot.cz/
http://www.kolumbus.fi/vera-aleksa.sula/english/welcome_to_wildbead.htm
http://www.abalorios.net/ABA/taller/tecnicas.asp
http://www.beadjewelrymaking.com/
http://ilgufoorecchini.wordpress.com/
http://happylandblog.blogspot.com/
http://ricamargioielli.blogspot.com/
http://sandrahalpennybeading.blogspot.ca/
http://www.comocriarbijuterias.com.br/
Thanks again to all concerned and best of luck to all!
Russian Spiral Necklace Tutorial
Hi everyone! I apologize for the lack of tutorials for the past couple of months, a lot has been happening and beading just didn’t fit in my schedule. But I am back now, bringing you one of my personal favorite pieces I’ve ever made yet. I hope you like it!
Olá todos! Me desculpo pela falta de PAPs nos últimos dois meses, estive muito ocupada e francamente não tive tempo para minhas miçangas. Mas estou de volta, trazendo uma das minhas pecas preferidas que tenho feito. Espero que gostem!
Materials / Materiais
11/0 bronze seed beads (b) / micangas 11/0 cor bronze ( b)
11/0 red seed beads (r). / micangas 11/0 cor vermelha (v)
11/0 blue seed beads ( bl ). / micangas 11/0 cor azul ( a )
11/0 blue bugle beads ( B). / canutilhos 11/0 cor azul ( c )
Thread and needle. / linha e agulha
2 8mm green glass rounds. / 2 contas de 8mm verdes de vidro
Clasp. / acabamento
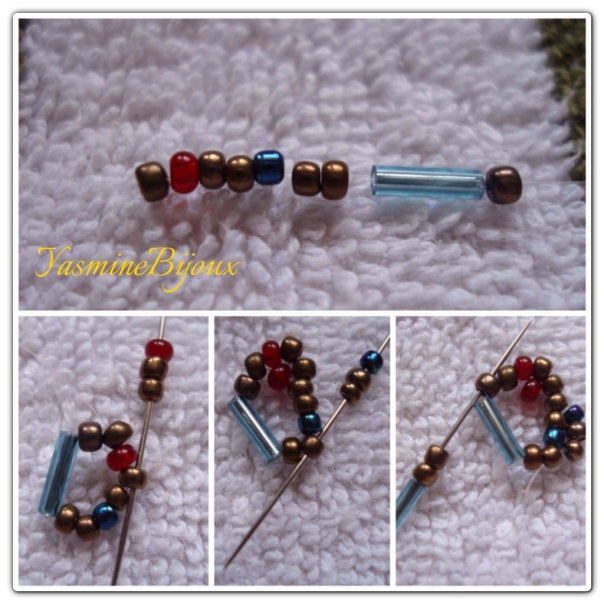
Pick up 1b, 1r, 2b, 1bl, 2b, 1B and 1B. Run your read back through all of them and the first bead again, forming a ring. Leave about 20cm of tail thread.
Now pick up 1r and 2b and go through the bead after the red in the ring. Repeat twice more, picking up 1 bl and 2b and going through the bead after the bl in the ring and finally pick up 1B and 2b and go trough the bead after the bugle in the ring.
Pegue 1b, 1v, 2b, 1a, 1c e 2c. Passe a agulha por todas e novamente pela primeira, formando um anel.
Agora pegue 1v e 2b e passe pela miçanga logo após a vermelha no anel. Repita mais duas vezes, pegando 1a e 2b e passando pela miçanga bronze seguindo a azul do anel e finalmente pegue 1c e 2b e passe pela miçanga após o canutilho no anel.
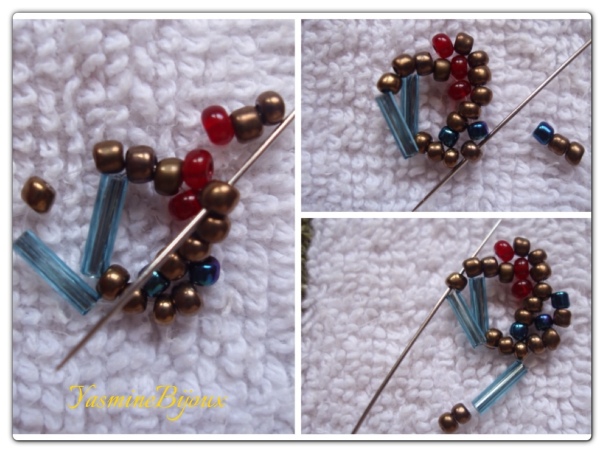
Repeat the steps above, always picking up first the color bead followed by two bronze beads. Remember to keep good tension on the thread.
Repita os passos acima, sempre pegando primeiro a miçanga colorida seguida por 2 bronze.
Lembre-se de manter boa tensão na linha.
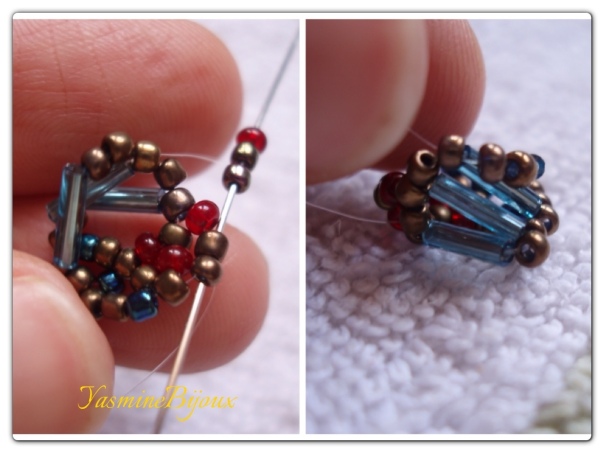
After about 4 rows your work is going to start to fold up, forming a spirally tube. Remember to keep your thread taught. Repeat the steps above until the desired length of the necklace. Remember the clasp will take up approximately 5cm.
Após cerca de 4 filas a peca começara a se dobrar, formando um tubo a espiral. Lembre-se da tensão na linha. Repita os passos acima até o comprimento desejado do colar. Lembre-se que o acabamento adicionara cerca de 5cm.
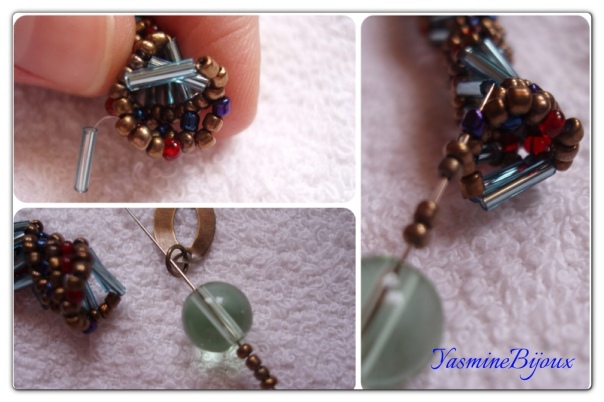
Now we are ready for the clasp. Add one final bugle bead to make the ring more even on this end ( the one you’ve been working on this whole time) and run your needle through all the beads on this last ring to strengthen.
Exiting from a bronze bead just before the blue seed bead, pick up 4b, the 8mm and go through the jump-ring in your clasp. Run your needle back through the 8mm and the 4b, exiting the blue bead in the ring.
Estamos prontos para o acabamento. Adicione um canutilho ao fim do colar para que o anel seja equilibrado ( somente no lado onde esteve trabalhando, não na outra ponta do colar) e passe a agulha por todas as contas que formam o anel para que fique mais seguro.
Saindo por uma miçanga bronze logo antes da miçanginha azul, pegue 4b, a conta de vidro de 8mm e passe pelo anel do acabamento. Passe a agulha de volta pela conta de 8mm e as 4b, saindo pela miçanga azul na ponta do colar.
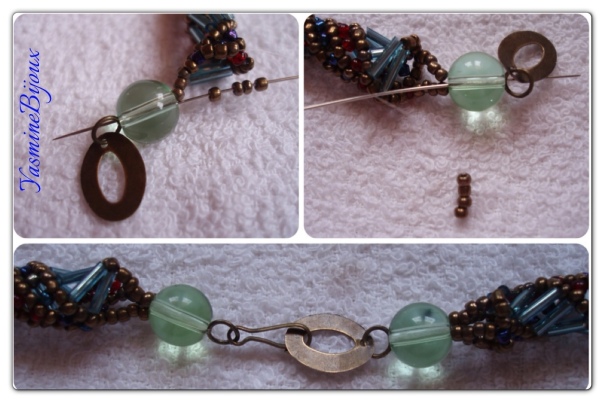
Repeat this step by running your thread down the ring until you exit the bronze bead just before the red bead then doing the same for the bugle.
Go through all the beads you just added to properly secure the clasp.
Do the same for the opposite end of the necklace, except here you don’t need to add the initial bugle to even out the ring. Simply secure the ring by running your needle through it a couple of times then add the clasp as we did in the previous step.
Repita este passo passando a agulha pelas miçangas na extremidade do colar até sair da miçanga bronze antes da vermelha e a mesma coisa para a miçanga antes do canutilho.
Passe a agulha por todas as miçanga, conta e acabamento que acabou de adicionar para reenforçar.
Repita os mesmos passos para a outra ponta do colar, só que aqui não é preciso adicionar um canutilho no inicio. Simplesmente assegure o anel na extremidade do colar passando a agulha por todas as contas e depois adicione a outra parte do acabamento como fizemos acima.
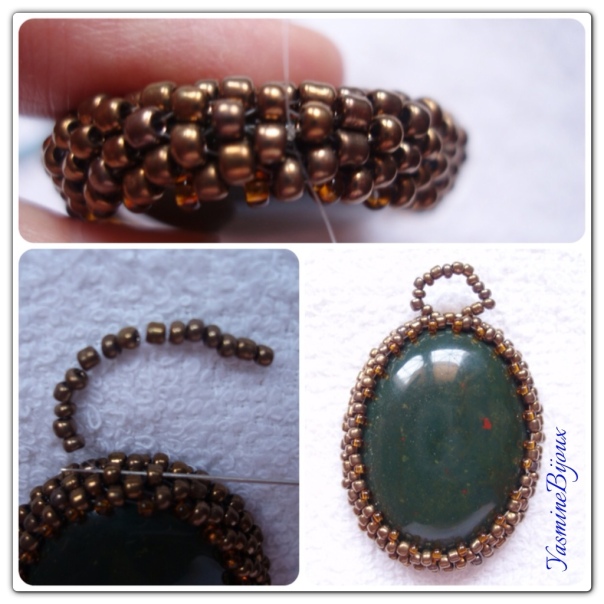
Now for the cabochon. Tie the end of a piece of thread, about 50cm to the very center of the bezel. If you like you can secure this knot with a drop of glue or nail polish. Pass your needle through a few beads to hide the knot and exit from another. Make sure you exit a bead that is close to another beside it, you don’t want any thread visible.( See bottom left picture for clarification).
Pick up 15b and go through the adjacent bead in the bezel from where you were first exiting ( again the picture will clarify), then go through the initial bead. Reinforce this by going through all the beads twice more. Tie off.
Agora para o cabochão. Amarre um pedaço de linha de cerca de meio metro no centro das miçangas cobrindo o cabochão. Se preferir pode assegurar este nó com uma gota de cola ou verniz de unhas. Passe a agulha por umas micangas para esconder o nó e saia por uma outra micangas. Assegure-se que esteja saindo de uma miçanga que seja bem perto de uma outra pois não queremos que linha seja visível ( veja foto em baixo a esquerda para esclarecer).
Pegue 15b e passe pela miçanga anterior daquele onde iniciamos ( mais uma vez a foto esclarecerá) e devolta pela miçanga inicial. Passe a agulha dentro dessas micangas mais umas duas vezes para reenforçar. Amare a linha e corre o excesso.
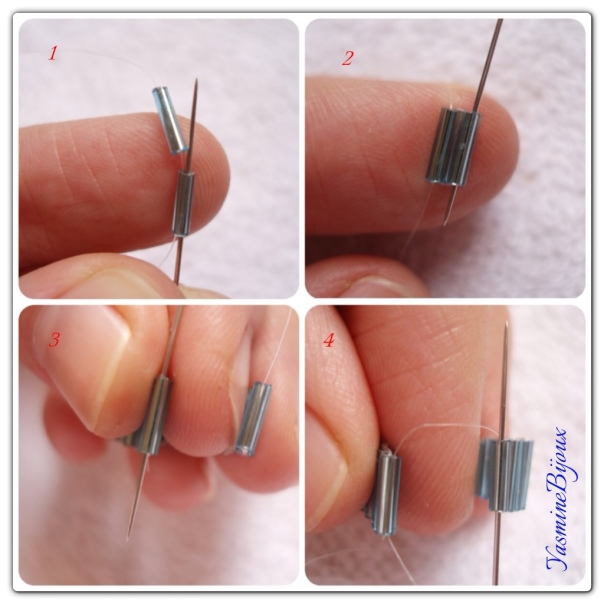
Now we’ll make the ring that will attach the cabochon to the necklace. Tis will be done using buggle and ladder stitch.
Pick up 2B and go back up thought the first, tighten, they will sit side by side. Go back down through the next bead. Pick up another bugle and go down through the previous bead then once again up through the one just added. Repeat until you have a strip of about 2cm. Pass through this the cabochon ring we just made. Now join the ends by wrapping the strip around your finger and using ladder stitch a few times to secure.
Add to your necklace and we’re done!
Agora faremos o anel que juntara o colar ao cabochão. Isso será feito somente com canutilhos e usaremos o ponto escada.
Pegue 2B e passe a agulha de volta pelo primeiro, aperte bem, eles ficarão de lado a lado. Passe pelo canutilho ao lado. Pegue mais um canutilho e deça pelo canutilho anterior e suba pelo canutilho apenas adicionado. Repita até obter uma tira de cerca de 2cm. Passe o anel do cabochão aqui. Feche este anel colocando a tira de canutilhos em volta do dedo e usando a mesma técnica junte as pontas, passando a agulha por elas algumas vezes para assegurar.
Coloque o pingente no colar e esta pronto!
Beaded Bezel Cabochon Pendant
Hi! So I’d been dying to make a cabochon pendant for ages but never got the courage to. I always worked up 2-3 rows and something would go wrong and I’d give up. Until this baby came by, that is! I also made a necklace for it and I’ll be posting the tutorial for that towards the end of next week. I apologize for the quality of the pictures, took them with my phone and had bad lighting but I hope it’s still clear enough. Hope you like it!
Olá! Então, estive querendo fazer um pingente usando uma pedra cabochão mas nunca tive a coragem. Sempre cheguei a fazer somente 2-3 filas com micangas e algo saia errado e em fim deixava o trabalho. Até quando fiz este aqui! Também fiz um colar e publicarei o PAP no fim da semana. Me desculpo pela qualidade das fotos, as tirei com o meu telefone e nao tinha boa luz mas espero que sejam claras suficiente. Espero que gostem!
Ciao! Allora, stavo morendo da la voglia di fare un pendente cabochon da un saco di tempo ma non ho avuto il coraggio di farlo fino adesso. Ho sempre lavorato fino a 2-3 fili ma poi qualcosa andava male e lasciavo perdere. Finalmente ci sono riuscita! Ho anche fato una collana per il pendente e pubblicherò il tutorial verso la fine della prossima settimana. Mi scuso per la qualità delle foto, le ho scattate col mio telefono e non avevo sufficiente luce ma spero che siano comunque sufficientemente chiare. Spero che vi piaccia!
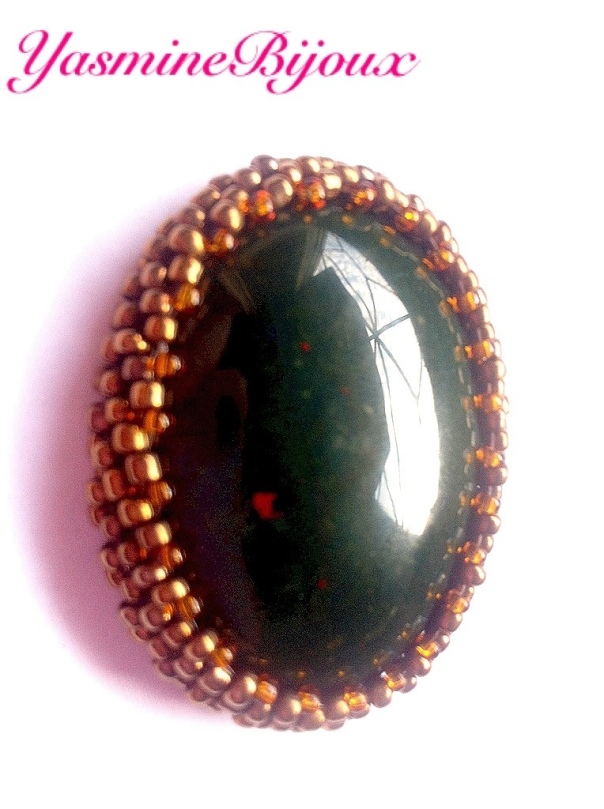
Mateirals/ Materiais
5cm cabochon/ pedra cabochão de 5cm/ pietra cabochon da 5cm
11/0 seed beads/ miçanginhas tamanho 11/0 / perline 11/0
15/0 seed beads/ micanginhhas tamanho 15/0/ perline 15/0
Beading thread/ linha para entrelaçamentos / filo
Beading needle/ agulha / ago
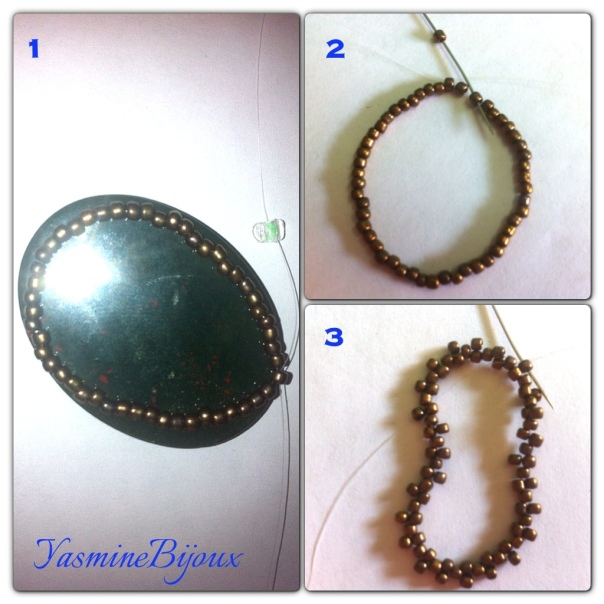
Begin by threading your needle with about 1m thread. Add a stop bead about 20cm from the end. Pick up about 50 11/0 seed beads and go back through all of them and again though the first, to form a ring. This ring should be about .5cm smaller than e cabochon.
From here on out we’ll work in peyote. Pick up a bead, skip the next bead in the row and go through the next. Repeat all the way around.
At the end of the row, go through the next bead in line, without picking up a bead, this is the “step up” we need to do to begin every row. Continue adding rows, keeping the tension relatively taught until you have about 5-6 rows. Place your cabochon over your work. The beads should be starting to show on the edges of the cabochon. From now on we’ll work with the cabichon in our hands and it’s important to keep the tension taught.
Iniciaremos colocando a agulha em 1m de linha. Adicione uma conta quase ao fim da linha, deixando cerca de 20c, da ponta.
Pegue cerca de 50 miçanginhas de 11/0 e passe a agulha de volta por todas e novamente pela primeira, para formar um anel. Este anel deve ser cerca de meio centímetro menor do cabochão.
De agora em frente trabalharemos com o ponto peyote. Pegue uma miçanga, pule a próxima e passe pela seguinte. Repita até o final.
No final do anel passe a agulha pela próxima miçanga, sem adicionar alguma. Este será o passo necessário para poder iniciar uma nova fila. Continue adicionando filas, mantendo a tensão bastante firme até completar 5-6 filas. Coloque o cabochão sobre o trabalho. As micangas deveriam estar começando a ser visíveis na extremidade da pedra. Apartir de agora, trabalharemos com a pedra em cima do trabalho, na mão,e é importante manter a tensão da linha bem firme.
Inizieremo con infilare 1m di filo nell’ago. aggiungete una perlina a approssimatamente 20cm dal estremità del filo.
Prendete circa 50 perline 11/0 e passate nuovamente attraverso tutte loro e nuovamente attraverso la prima, formando un anello. Questo anello dovrà essere circa 5cm più piccolo del cabochon. Da questi momento in poi la lavoreremo col peyote. Prendete una perlina, saltate la prossima perlina nella fila e passate attraverso la successiva. Ripetete tutt’intorno. Alla fine della linea, passate attraverso la prossima perlina della fila senza prendere una perlina: questo è lo “step-up” o alzata che dobbiamo fare all’inizio di ogni riga. Continuate ad aggiungere file, continuando a mantenere un’adeguata tensione nel filo, fino a completare 4 o 5 righe. Posizionate il Cabochon sopra il vostro lavoro. Le perline dovrebbe cominciare ad apparire all’estremità del cabochon. Da questo momento in poi, lavoreremo con il cabochon in mano ed è importante mantenere la tensione nel filo.
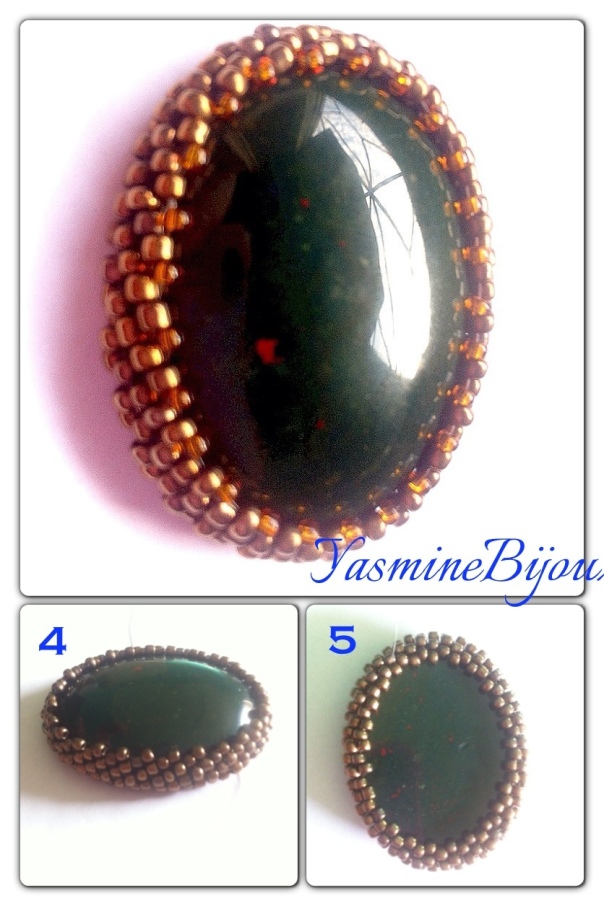
Continue beading until your cabochon is held inside the bezel, albeit weakly. Now, using 15/0 weave another row, this will tighten the bezel. Finish off your work by going through beads and tying knots. Cut off excess thread.
Now place a needle in the thread in the back of the bezel and repeat the step above, adding a row of 15/0’s. Tie off.
Continue entrelaçando até que o cabochão fique dentro das micangas, mesmo se meio solto. Agora, usando as miçangas 15/0 adicione mais uma fila, isso apertara o trabalho. Termine a peça passando a linha por varias miçangas e amarrando a linha. Corte o excesso.
Coloque a agulha na linha no posterior da pedra e repita o passo acima. Corte excesso de linha.
Continuate a lavorare fino a quando il cabochon è trattenuto al’interno della cornice, anche se debolmente. Adesso, usando perline 15/0 aggiungete un’altra riga, questa stringerà la cornice. Finite il lavoro attraversando le perone e legando i nodi. Tagliate il filo in eccesso.
Adesso mettere l’ago nel filo sul retro della cornice e ripetete il passo precedente, aggiungendo una riga di perline 15/0. Legate.
Done! I hope this is clear but if you have any difficulty or would like more pictures to detail the steps just let me know 🙂
Pronto! Espero que seja claro mas se tiverem alguma dificuldade ou se quiserem que adicione mais fotos para detalhar os passo é só dizer 🙂
Fato! Spero che la spegazzione sia stata chiara ma se avete delle difficoltà o se volete altre foto che detagliano i passi fattemelo sapere 🙂
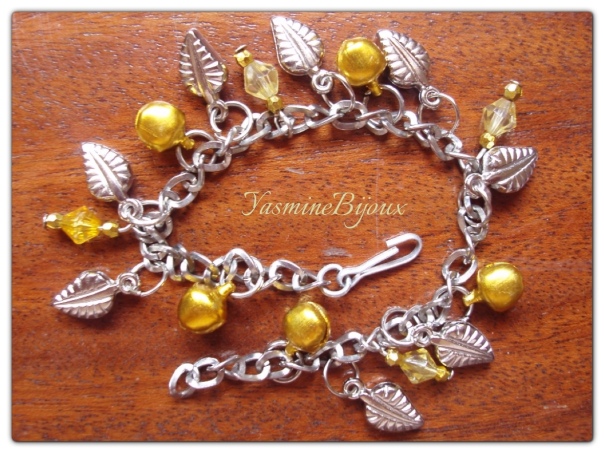
How to Make a Charm Bracelet
Hi! Today I’ll be showing you how to make a charm bracelet. I’d recently made one of these for a friend but I liked it so much I just had to make one for myself! Of course, you can use any charm and bead order you like, this is just to show the procedure. Enjoy!
Olá! Hoje veremos como fazer uma pulseira com charmes. Algum tempo atras fiz uma dessas pulseiras para uma amiga mas gostei tanto que tive que fazer uma para mim mesma! Claro, podem usar qualquer charmes, pingentes e contas que quiserem, este PAP é somente para mostrar o modo de fazer. Espero que gostem!
Ciao! Oggi vedremo come fare un braccialetto di pendenti. Poco tempo fa ho fatto un bracialletto così per un’amica ma mi e piaciuto tanto che ho finito per farne un altro anche per me! Certamente, potrete usare qualunque perlina o pendenti , questo tutorial serve soltanto per dimostrare la procedura. Spero che vi piaccia!
Chain / corrente / catena
4mm bicones/ cristais de 4mm / cristalli 4mm
2mm bicones / cristais de 2mm/ cristalli 2mm
6mm bells / pequenos sinos de 6mm/ campanelle 6mm
Leaf charms/ pingentes de folhas/ pendenti di foglie
Jump rings/ anéis metálicos / anelli metallici
Head pins/ contrapinos /Chiodini a S
Clasp / acabamento/ chiusura
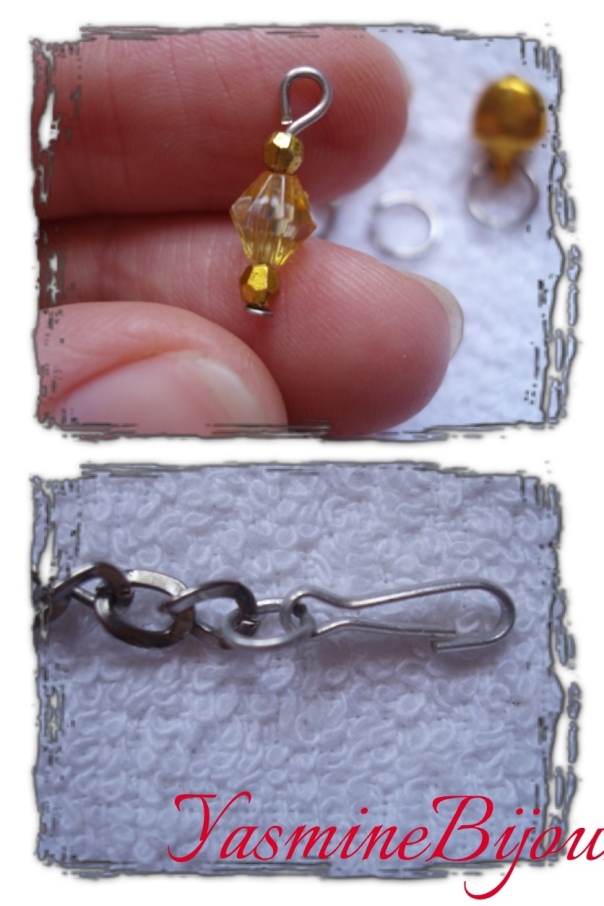
pick up a 2mm, an 8mm and a 2 mm bicone on a headpin. Fold the top into a loop and cut off excess wire. Repeat with all headpins. Add a jumpring to all charms except these headpins.
Attach the clasp to the ends of the chain.
Pegue um cristal de 2mm, um de 6mm e mais um de 2mm e coloque-os em um contrapino. Dobre a parte de cima do contrapino em um anel, cortando o excesso de arame. Repita para todos o contrapinos desejados. Coloque um anel metálico em todos os pingentes. Encaixe o acabamento nas pontas da corrente.
Infilate una perlina da 2mm, una 8mm ed una 2mm nel chiodino a S.
Piegate la parte superiore in due e tagliate l’eccesso. Ripetete con tutti gli altri chiodini.
Aggiungete un anello a tutti pendenti tranne questi chiodini.
Attaccate la chiusura alle estremità della catena.
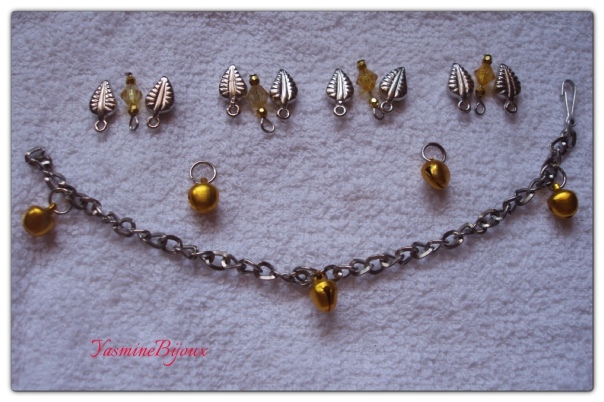
Lay out your chain and place a bell in the very center. Fold your chain in half and add a bell to either end of the chain, evenly spaced, leaving a few rings of chain empty between the bells and the clasp. Now add another bell in the space between the center and left bell. Repeat for opposite side.
Set the charms in the order you want to use. Once again lay out your chain and add the charms, making sure you keep count of the space between each of them so the bracelet is even.
Coloque um sino no centro da corrente. Dobre-a ao meio e coloque um sino em cada ponta, deixando insanos da corrente vazios entre esse sino e o acabamento. Repita para o lado oposto. Agora adicione mIs um sino no centro entre o sino central e o externo. Repita para lado oposto. Organize os pingentes na mesa da forma que pretende usar-los. Abra bem a corrente e um por um encaixe os pingentes, contando sempre quantos anéis da corrente tem entre cada um par que a pulseira não saia torta.
Posate la catena ed infilate una campanella nel centro. Piegate la catena in due e aggiungete una campanella a ognuna delle estremità della catena, a intervalli uguali, lasciando alcuni anelli della catena tra le campanelle ed la chiusura vuoti.
Adesso aggiungete un’altra campanella nello spazio tra la campanella centrale e quella di sinistra. Ripetete dal lato opposto. Mettete i pendenti nel ordine in cui volete usare. Ancora una volta sdraiate la catena e aggiungete i pendenti, assicurando vi di tener d’occhio lo spazio tra ogni pendente affinché la loro disposizione sia bilanciata.
Il Bracialletto è finito!
E esta pronto!
Done!

